How to automate component end-of-life checks on a BOM
A practical guide for hardware teams on automating component obsolescence and end-of-life checks. It covers lifecycle statuses, PCN and PDN monitoring, risk scoring, design review triggers, and choosing between a last-time buy, an alternate, or a redesign.
The short answer: run lifecycle checks wherever the BOM changes
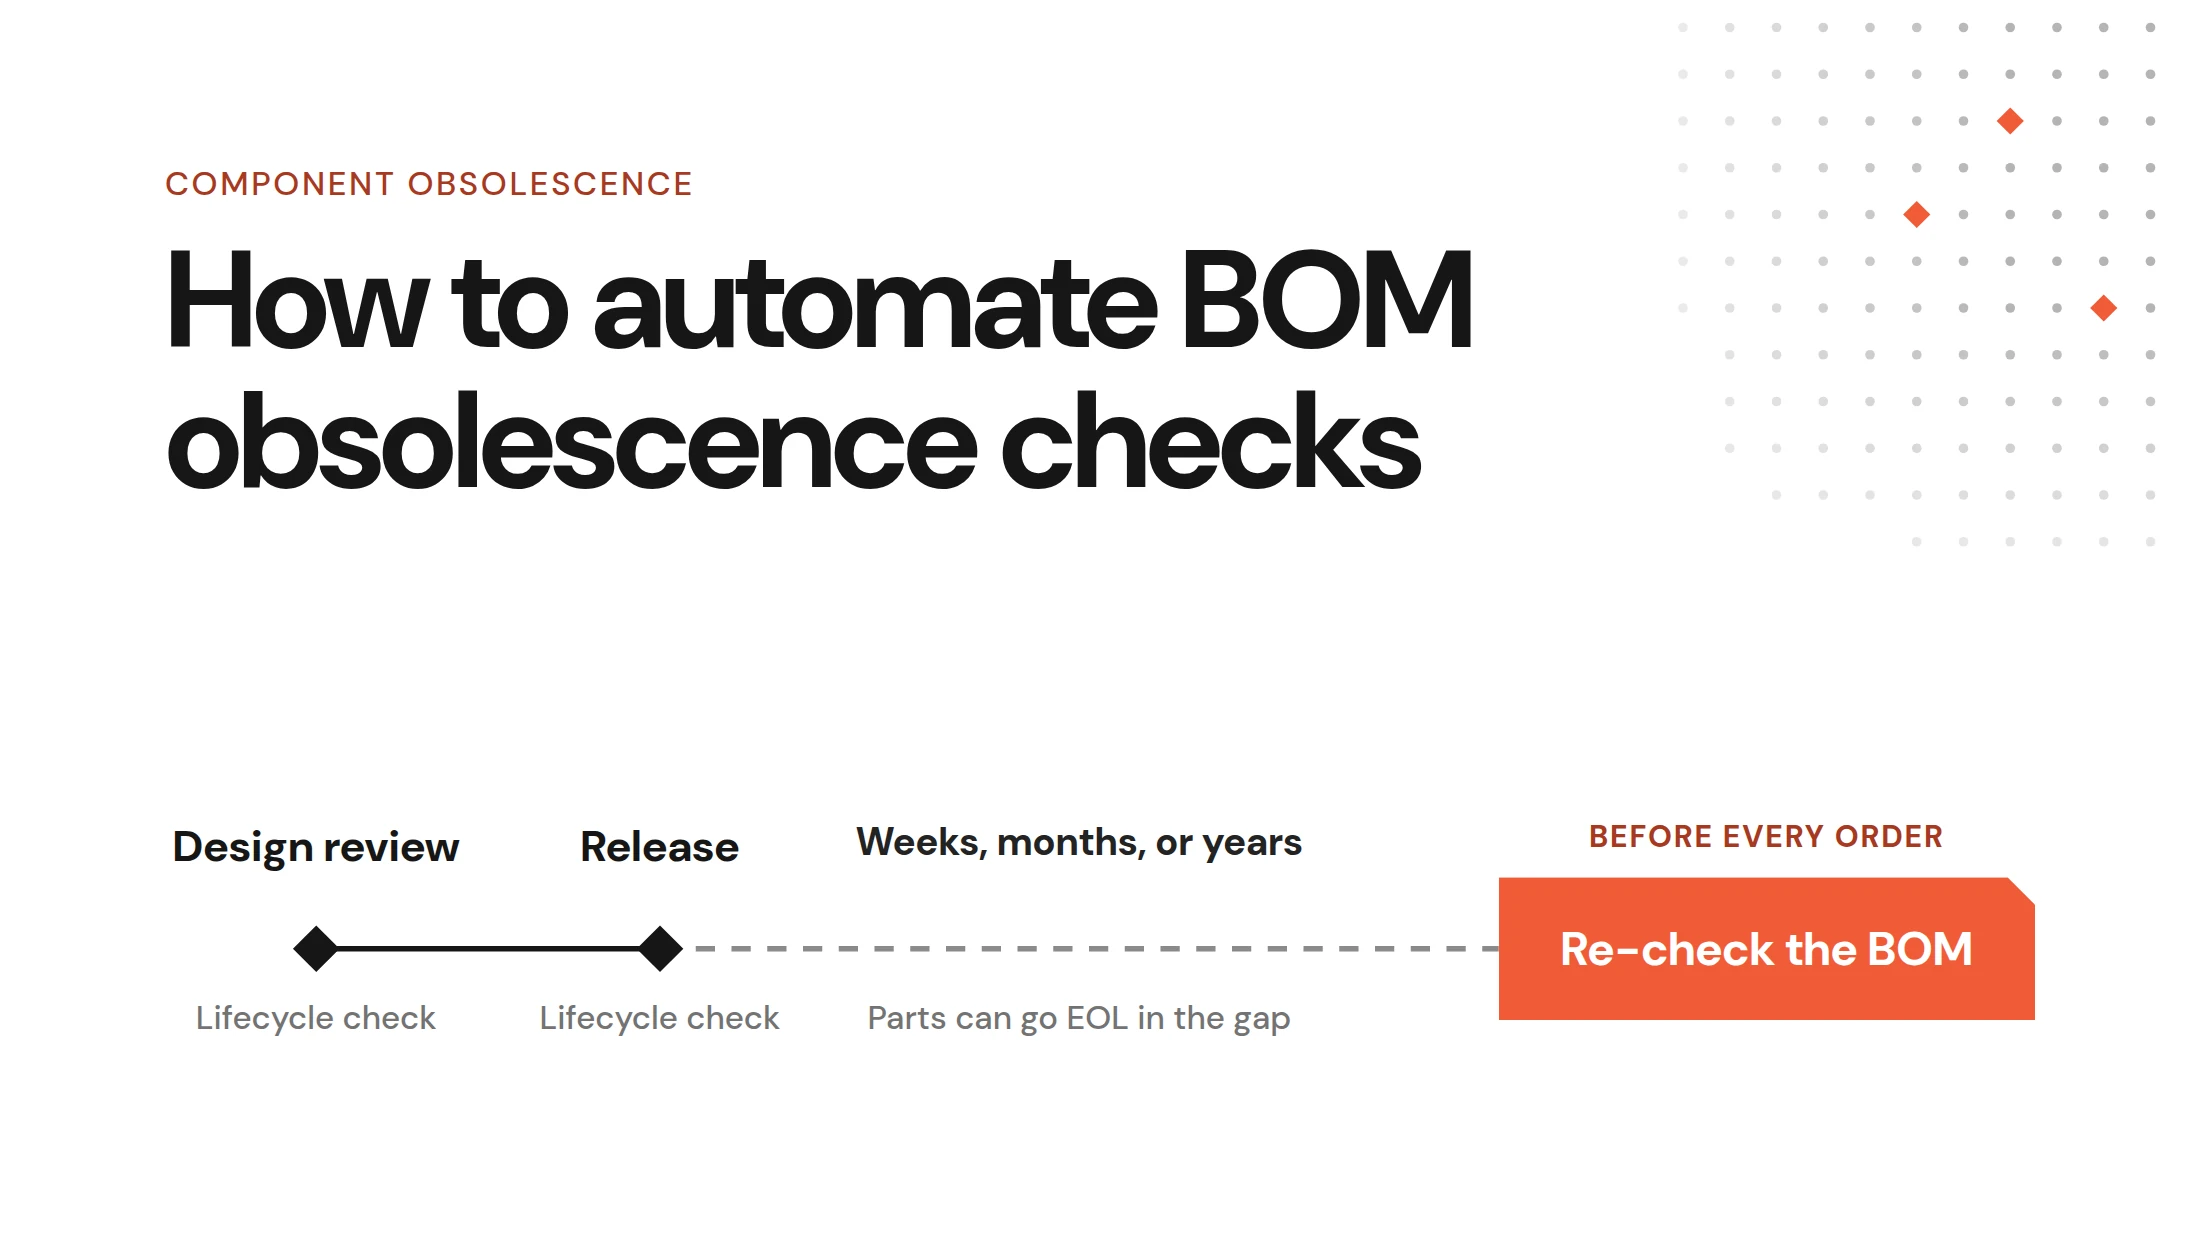
To automate end-of-life checks, pull lifecycle status for every manufacturer part number (MPN) from a parts-data API and score each line on probability and impact. Subscribe to supplier discontinuance notices and match each one against every active BOM. Run the check on every design review and release, then route flagged lines to an engineer for a last-time buy (LTB), alternate, or redesign decision.
Here is the failure this prevents. A contract manufacturer (CM) reports at build that a part is end-of-life (EOL), and the team picks a substitute under schedule pressure. The substitute has a different reference voltage on one pin, which breaks compatibility and sends the board back for a respin.
Nothing about that lookup needed a person. Checking lifecycle status across a few hundred MPNs is repeatable and rules-based, so automate it. Choosing what to do about a flagged part depends on remaining product life and qualification cost, so that decision stays with an engineer.
What obsolescence and lifecycle status mean on a BOM
A part is obsolete when its manufacturer stops making it to the original specification. The US Department of Defense uses a broader term, diminishing manufacturing sources and material shortages (DMSMS), for the loss or impending loss of a supplier. The two overlap, but a part can be obsolete with plenty of stock on hand, and an active part can still be short.
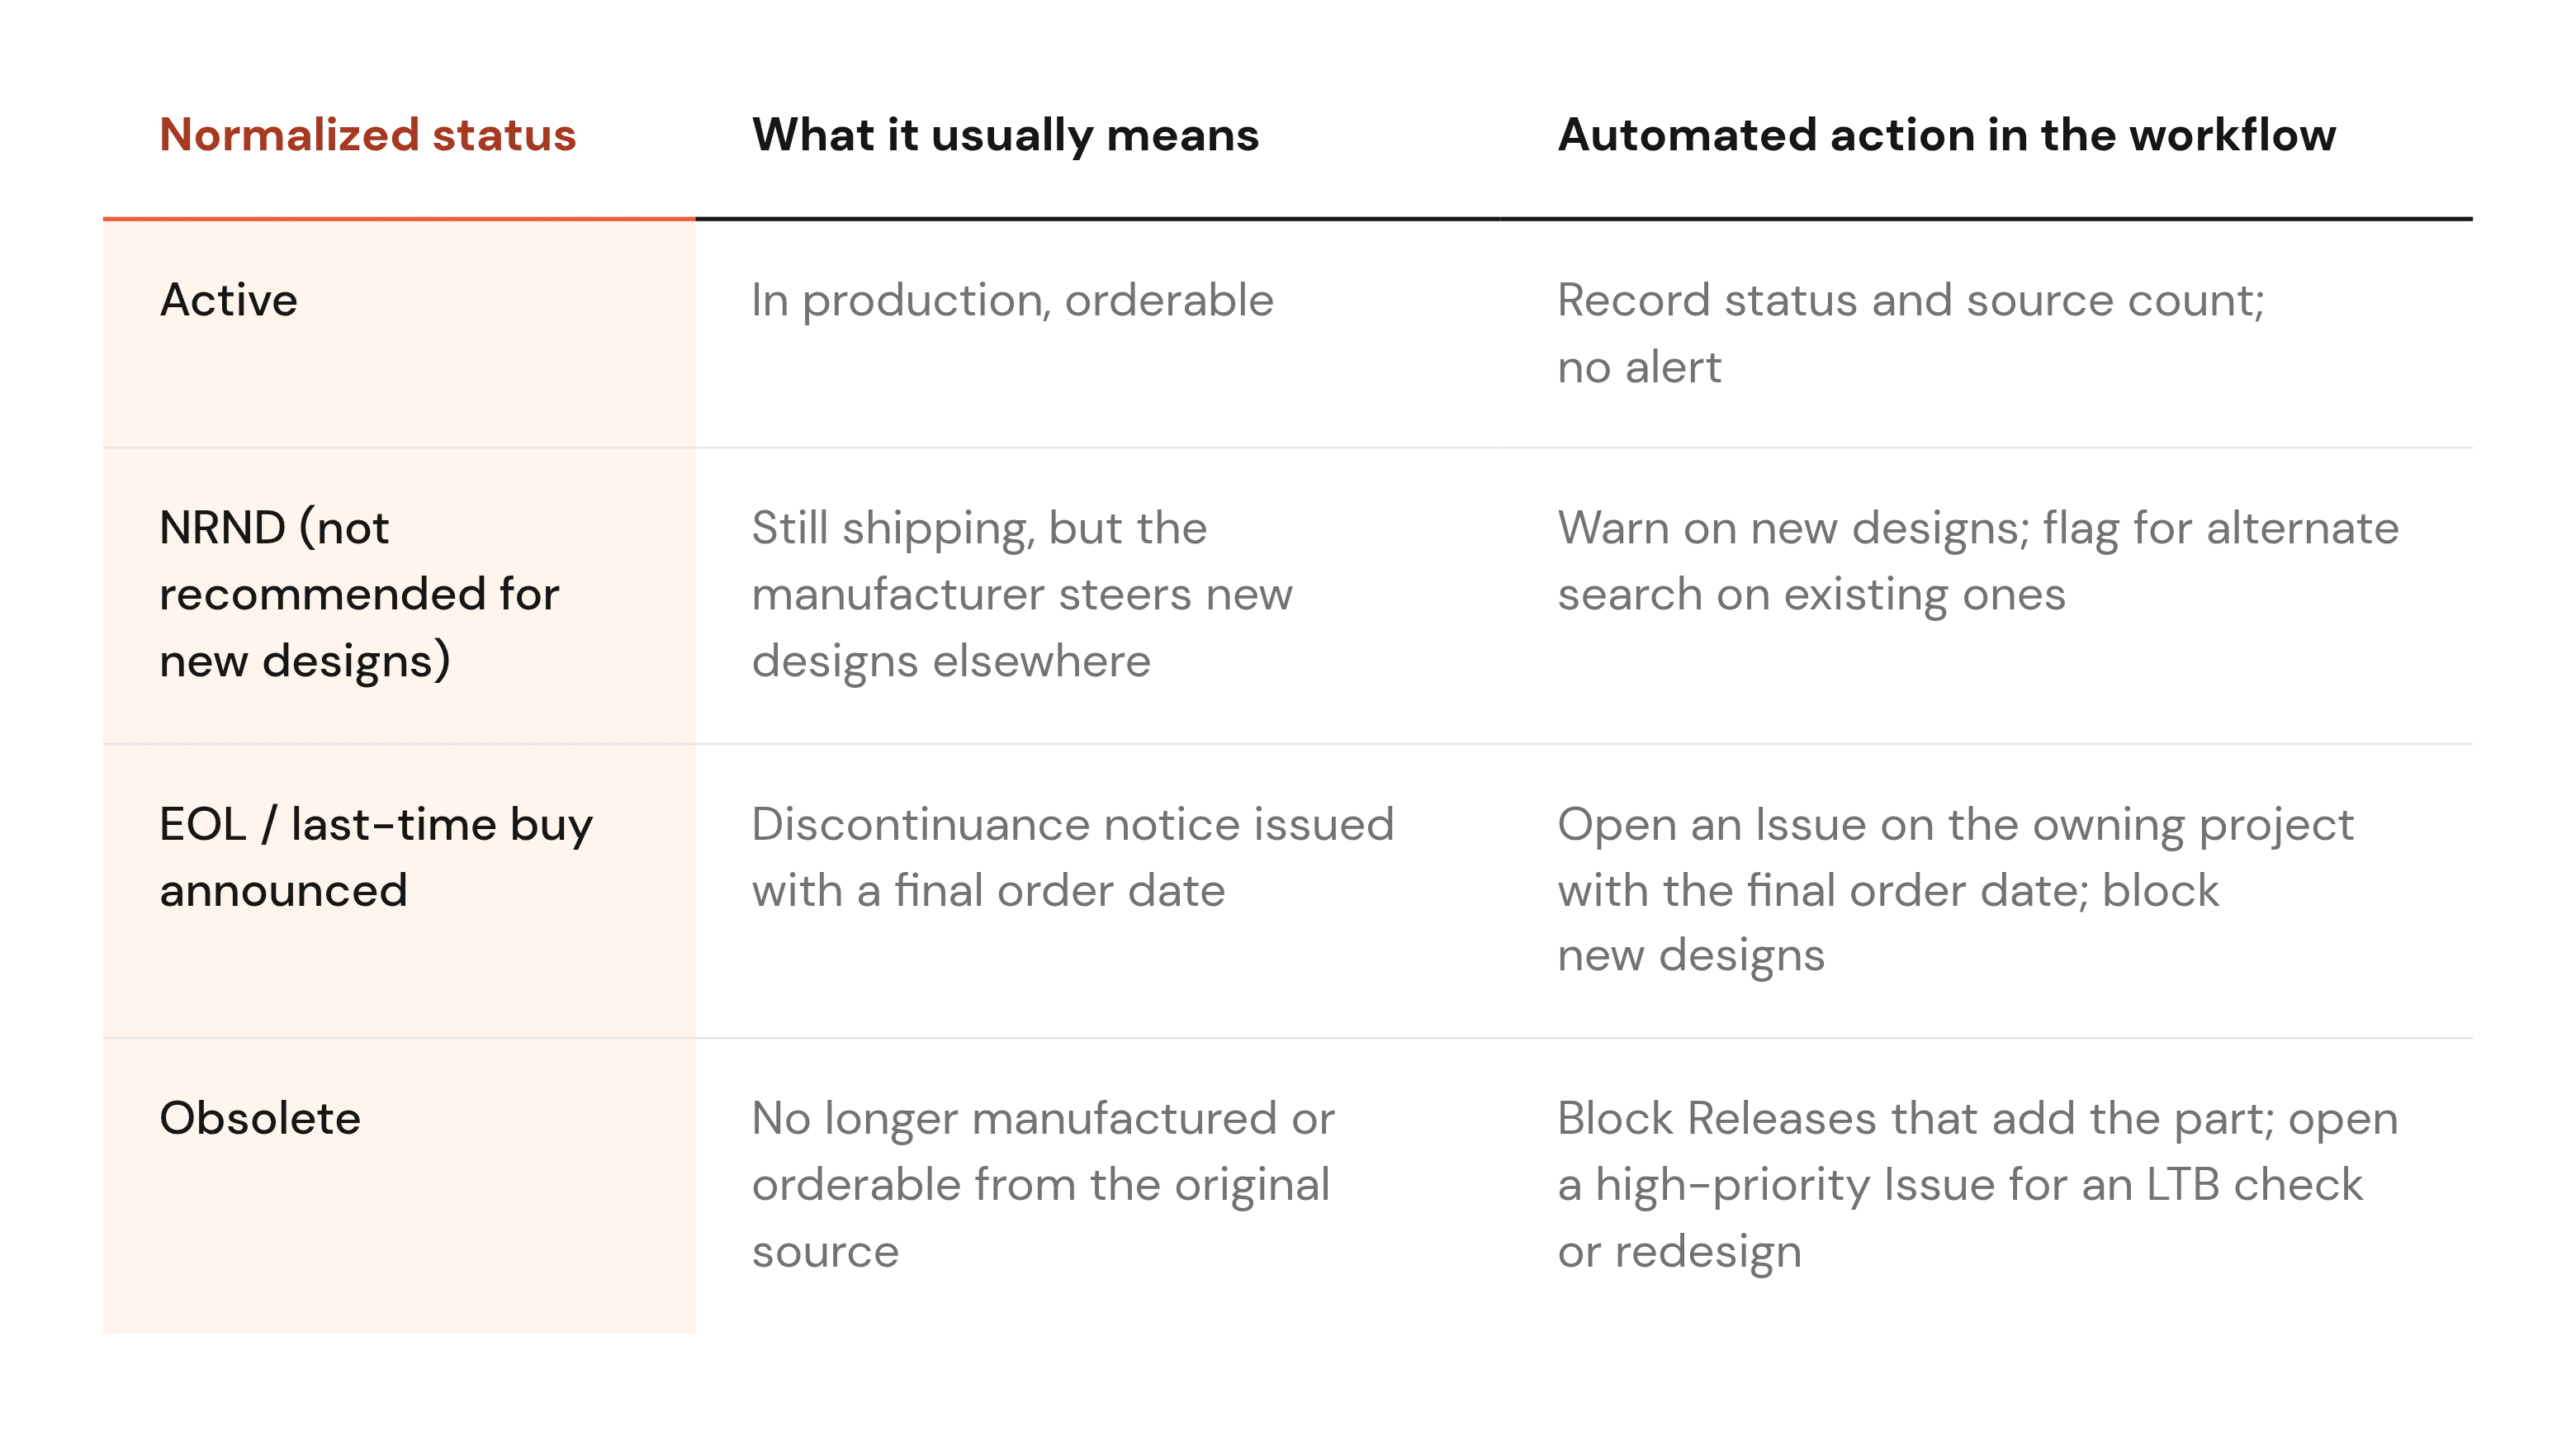
Managing obsolescence on a BOM starts with knowing which state each line is in. No single standard taxonomy for lifecycle labels exists. Your first job is to normalize the labels your parts-data source returns into a short list your workflow can act on.
Lifecycle statuses you will see in parts data
The labels below are common industry usage, and the exact wording varies by data provider. Map each one to an action:
Step 1: Build a living BOM health map
A BOM health check starts at the MPN level. Break every assembly down to individual MPNs, including the alternates on your approved vendor list (AVL). An alternate that is itself NRND does not reduce the risk.
Next, filter out low-risk lines. Commodity passives with many qualified sources rarely need individual tracking, so filter them by source count and focus on single-source and sole-manufacturer lines. Every remaining line gets a lifecycle status and a source count attached.
The status quo at many manufacturers we work with is a checklist in Excel, walked by hand against datasheet PDFs. That works for a 60-line board.
One customer team building server products told us their boards carry over 1,000 components. Any manual pass on boards that size is out of date as soon as the BOM changes.
The fix is to store the health map alongside the design revision it describes. In Allspice, an Automation can run a scripted check that calls the parts-data API your team chooses and records the results against that revision. Our post on automating component validation tests walks through the setup.
Step 2: Automate PCN and PDN monitoring
Suppliers announce changes through product change notices (PCNs) and product discontinuance notices (PDNs), and those notices are the earliest end-of-life signal most teams get.
Suppliers usually give at least 6 months after a discontinuance notice to place a final order. That minimum comes from JEDEC's product discontinuance standard. Supplier agreements can set different terms, so check yours.
PCN and PDN monitoring works best as a scheduled job:
- Ingest notices through your distributor or parts-data APIs.
- Match each notice against every MPN in every active BOM, including AVL alternates.
- Open an Issue on each affected project, with the notice link, affected designators, final order date, and owning engineer.
- Notify the owner in the project tracker your team already uses.
Processes most often fail at the last two steps. An end-of-life notice in a buyer's inbox is invisible to the engineer who owns the design. An Issue on the project stays attached to the design, with a history of who saw it and what they decided.
Step 3: Score risk by probability and impact
Not every flagged line deserves the same response, so the next step is an obsolescence risk assessment. Score each line on two axes: how likely it is to become unavailable, and how much it would hurt if it did.
Probability factors include lifecycle status, number of manufacturers, years since introduction, and annual usage. Impact factors include functional criticality, pin compatibility of the best alternate, footprint compatibility, and qualification burden. A script can compute both scores and combine them into a tier.
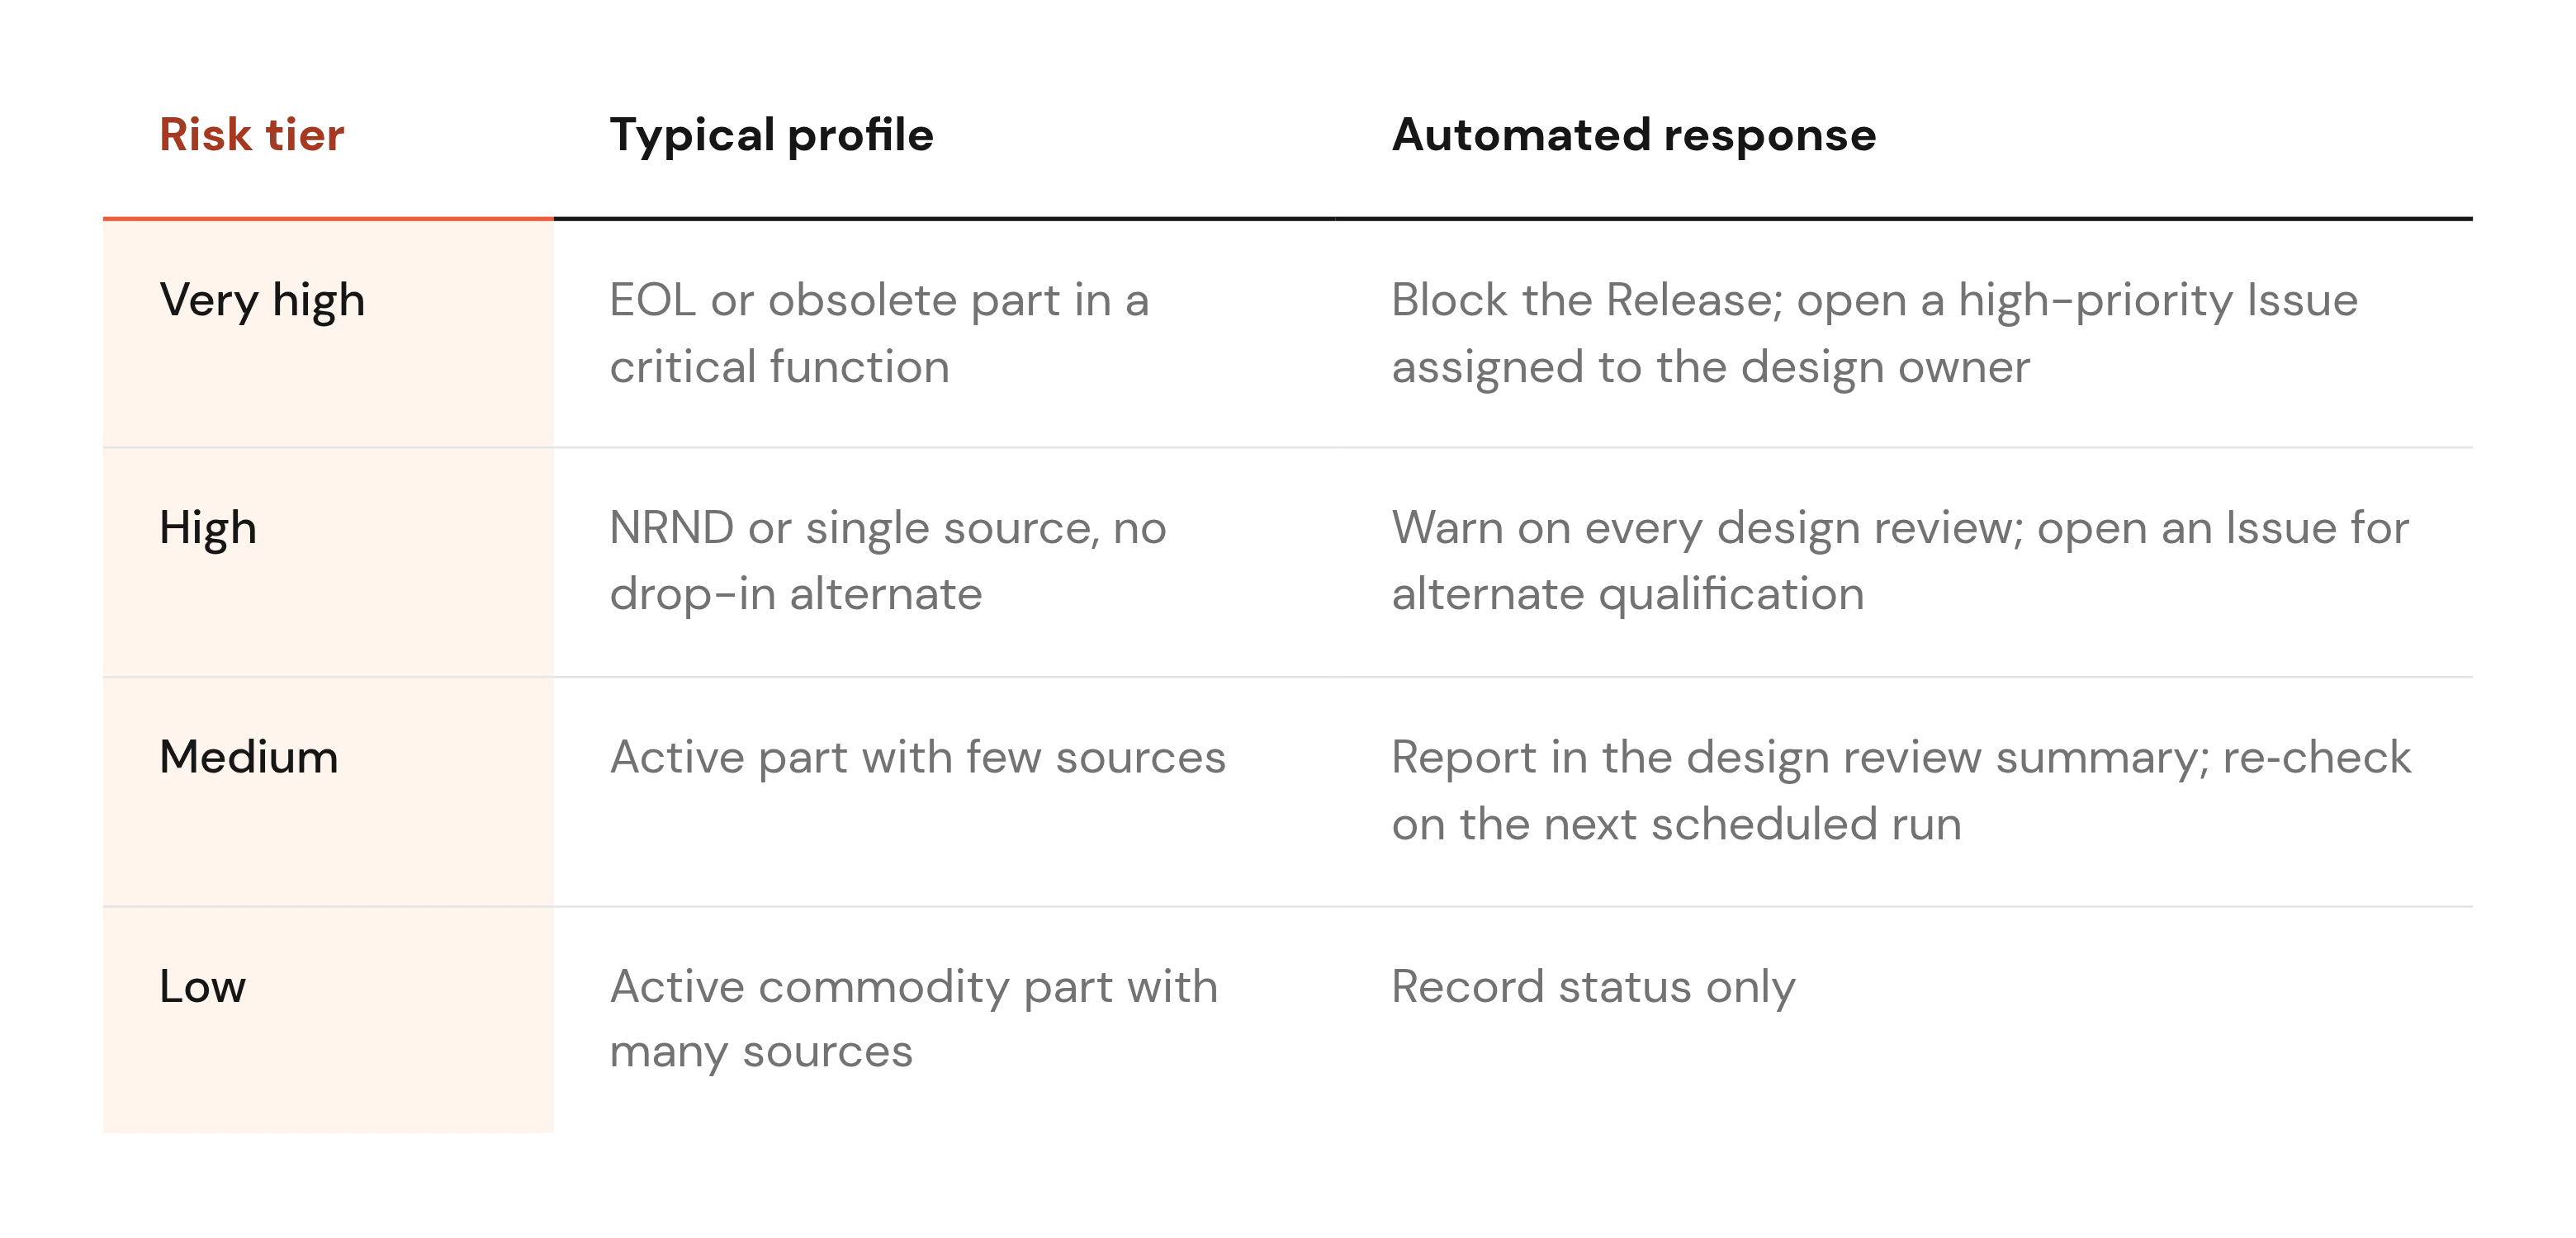
The DoD DMSMS guidebook (SD-22) cites an informal US Army study of two predictive obsolescence tools. The tools recognized only 71% and 72% of the parts researched. Keep an engineer reviewing the Very high and High tiers, and cross-check critical parts against a second source.
Step 4: Run the check on every design review and release
Many teams treat lifecycle data as a periodic procurement report. The BOM changes during design, so that is where the check belongs. SD-22 makes the same recommendation, advising teams to start reviewing parts lists at preliminary design review.
In practice, this is automated BOM validation built on Automations for hardware CI/CD. Allspice and DRCY read native files from Altium, KiCad, OrCAD, Allegro System Capture, DeHDL, and DxDesigner with no export step. Our post on how DRCY reads native files covers the details.
The trigger points are the same across ECAD tools:
- When a Design Review opens, run the lifecycle check and post results to the review.
- When the BOM changes on a branch, re-run the check on the changed lines.
- Before a Release is cut, block it if a new design adds an obsolete part, and warn on NRND or EOL parts.
- On a schedule, re-run the check against every BOM already in production.
Automations cover the lookup. Reviewers still need prompts for the judgment calls, so add lifecycle items to the checklist itself.
Ask whether each single-source part has a named alternate, and whether any NRND part was a deliberate choice. Our design review checklist template is a starting point you can extend.
Step 5: Route the decision: last-time buy, alternate, or redesign
Once a line is flagged and tiered, someone has to choose a path. The choice between a last-time buy and a redesign depends mostly on remaining product life and whether a qualified alternate exists.
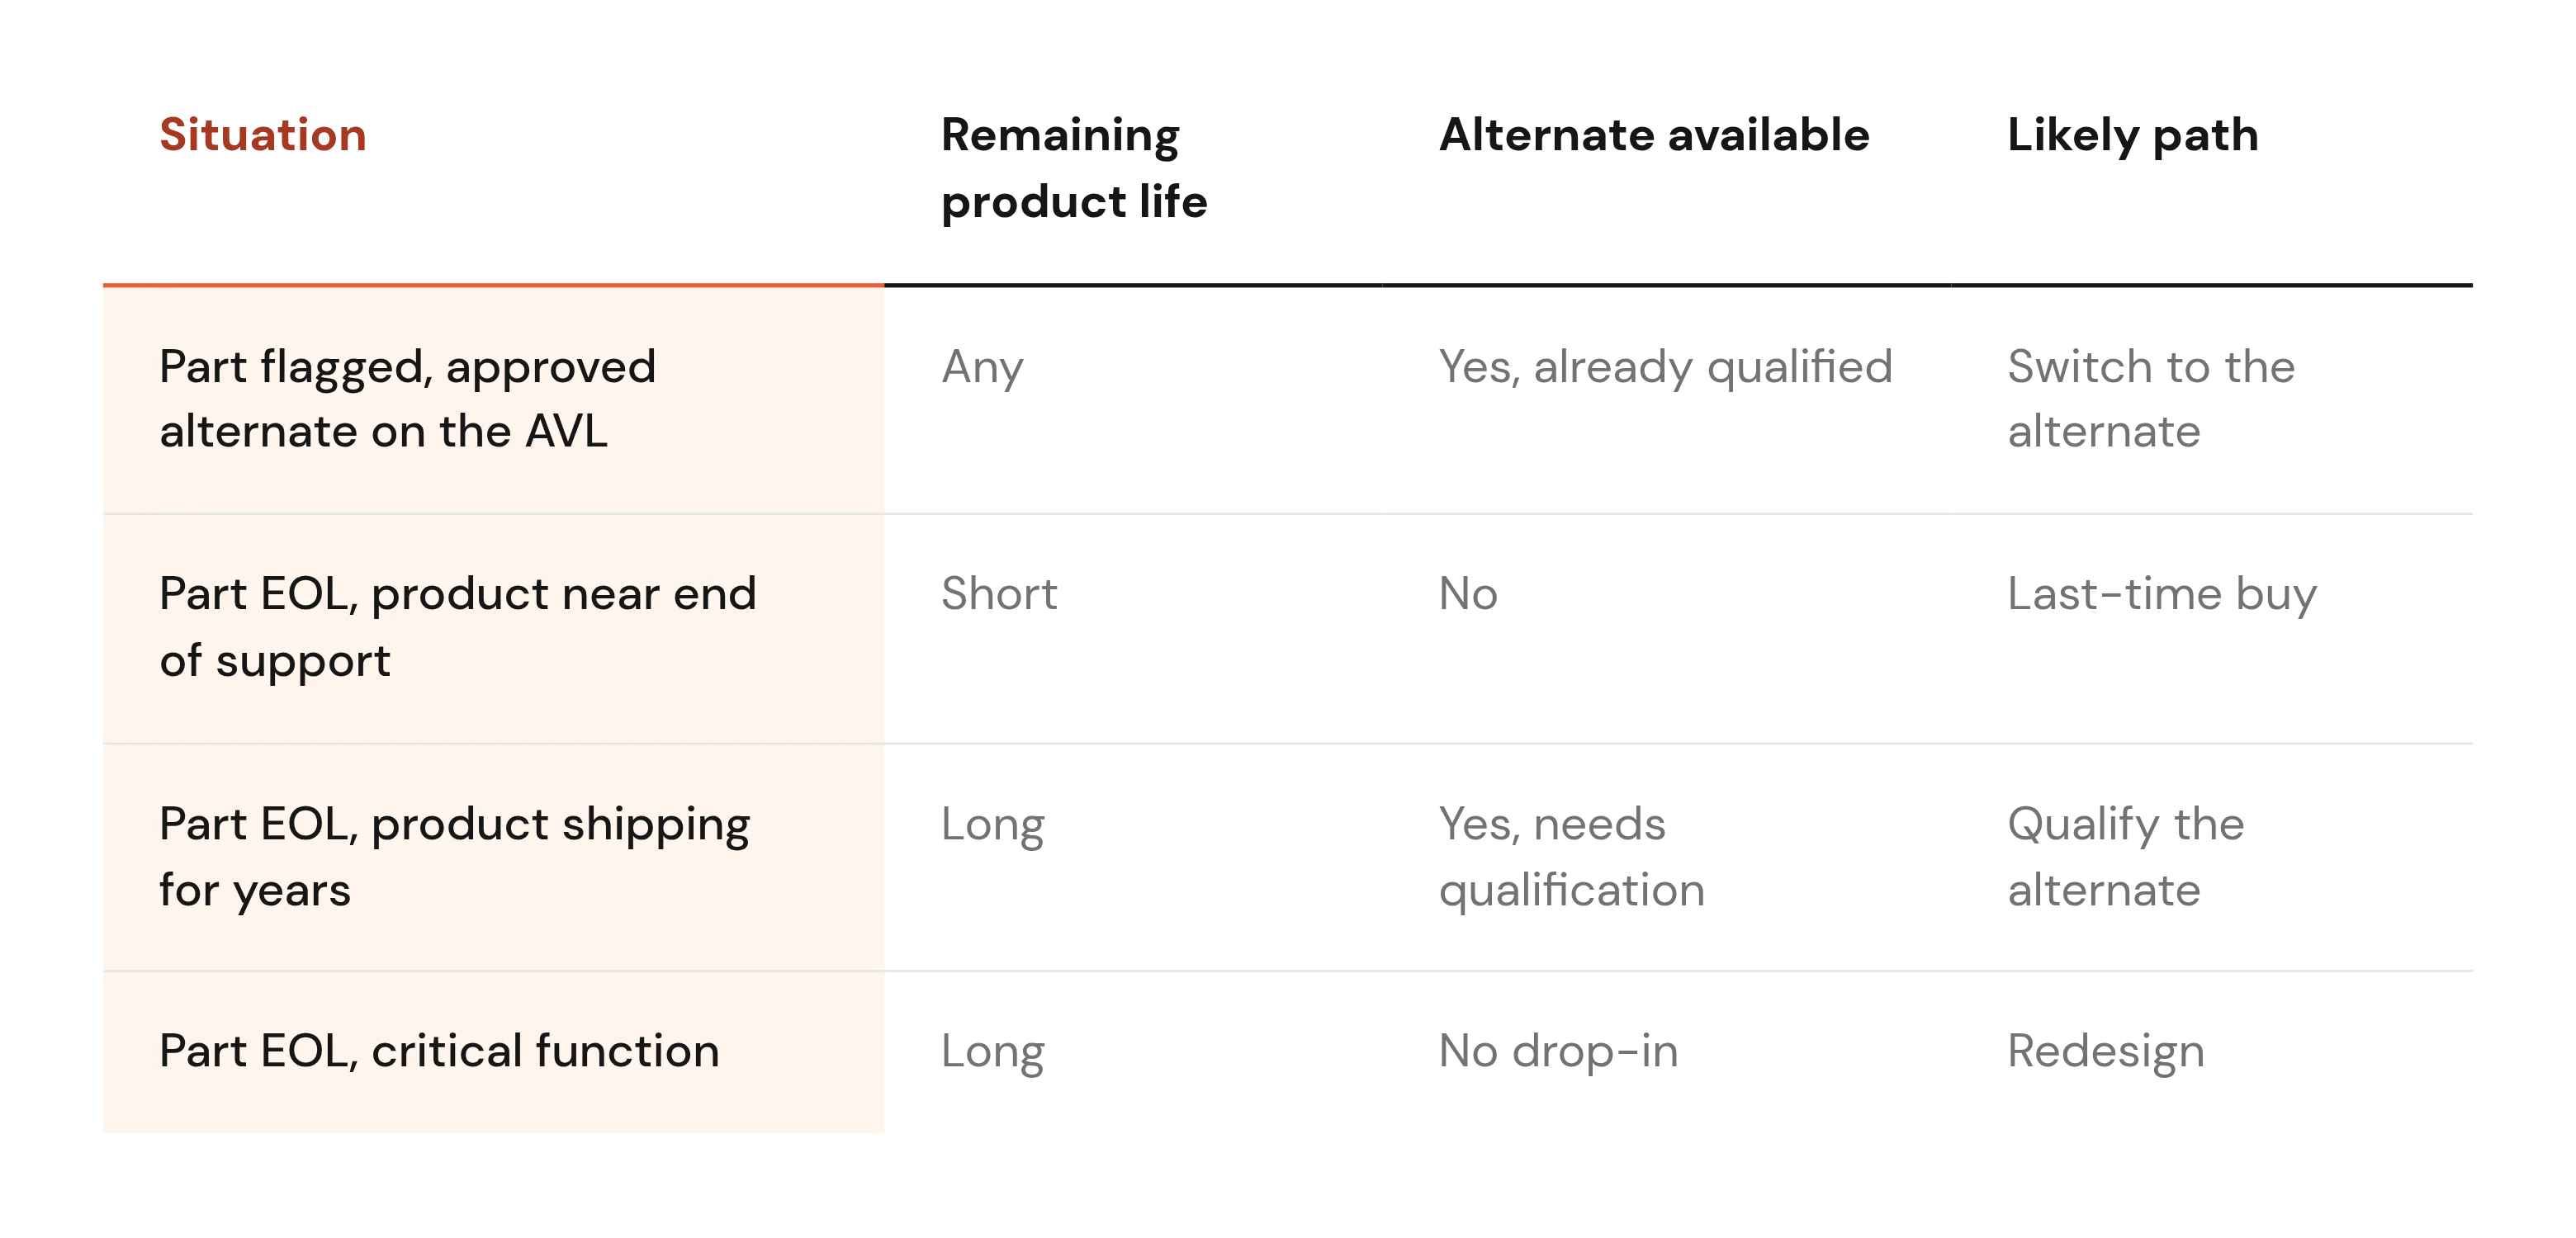
US defense data shows how wide the cost gap between these paths is. A DoD DMSMS cost survey from the Defense Standardization Program Office covered 4,562 reported DMSMS cases in 2014. Mean resolution costs were $1,028 for an approved alternate, $5,234 for a life-of-need buy, $1.09M for a next-higher-assembly redesign, and $10.29M for a complex redesign.
Those are 2014 defense-program figures that exclude part purchase costs, so don't read them as commercial prices. The pattern still holds: the earlier a flag appears, the more of the cheap options remain. Our post on component validation during shortages covers the same tradeoff from the supply side.
Sizing a last-time buy
A last-time buy quantity calculation starts with a simple formula: monthly demand × remaining months of support × safety factor. The safety factor is a team choice that covers scrap and forecast error. Pull demand straight from your enterprise resource planning (ERP) system so the estimate tracks actual usage.
As a worked example with stated assumptions, a board uses one regulator per unit and ERP shows 400 units a month. Support runs another 30 months, and the team picks a 1.15 safety factor. The buy is 400 × 30 × 1.15 = 13,800 parts.
The IPC/JEDEC J-STD-033D standard (April 2018) gives dry-packed moisture-sensitive SMD parts a minimum 12-month shelf life from the bag seal date. Stock meant to last 30 months needs a storage plan before the purchase order goes out.
Qualifying an alternate against the datasheet
Alternate component qualification comes down to the new part's datasheet. Check pinout, electrical limits, rail compatibility, and derating against the actual circuit.
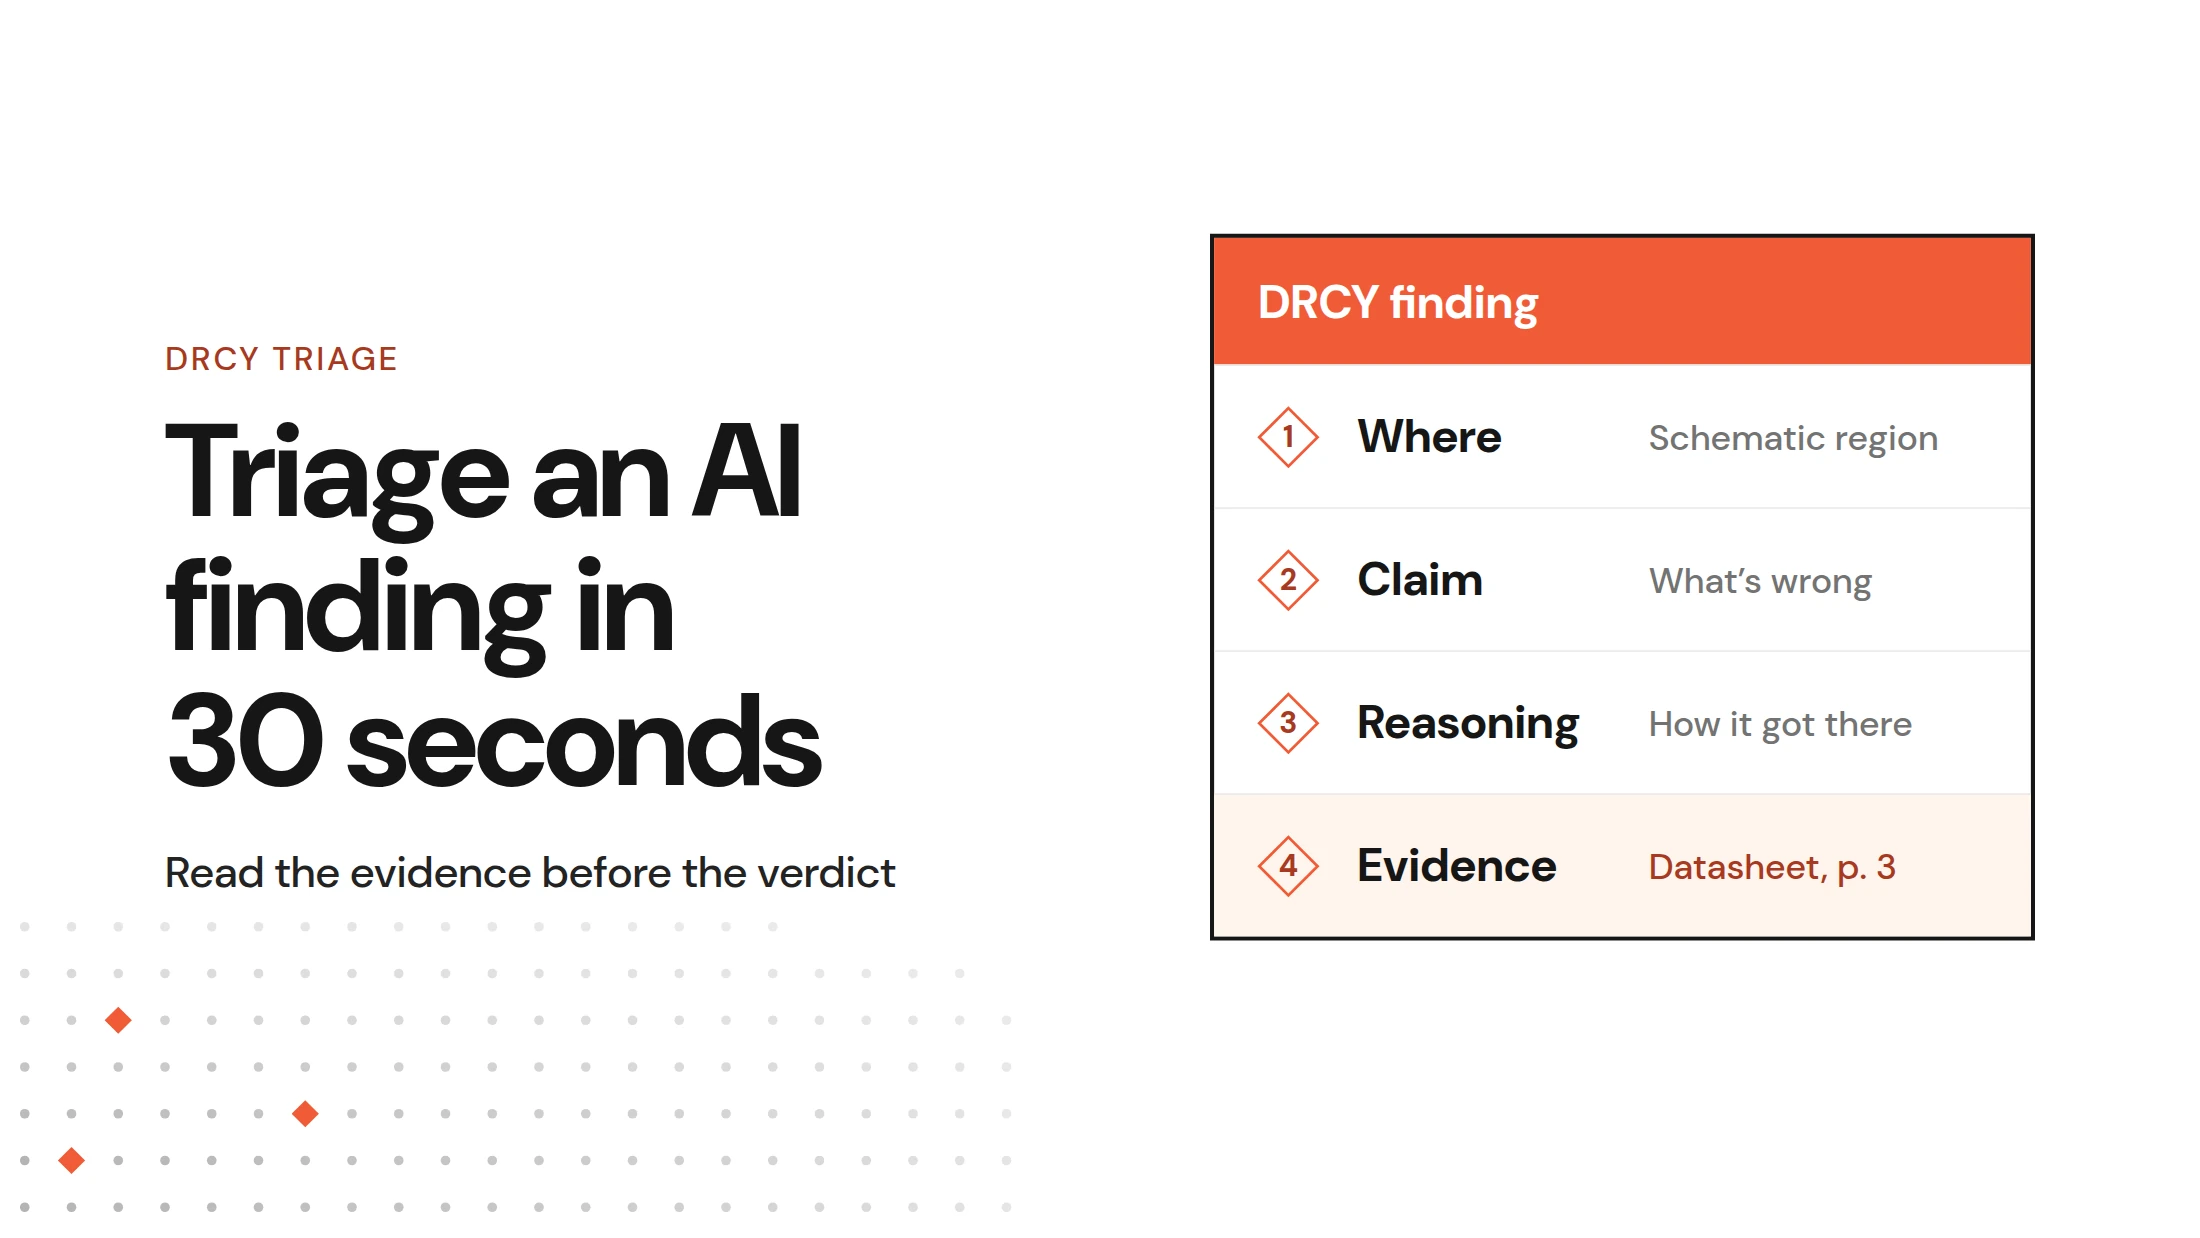
This is where a DRCY datasheet-driven first pass helps. DRCY reads the datasheets for parts in the design and cites the datasheet page behind every finding.
One typical flag is a 6.3V capacitor on a 5V rail that fails your derating rule. Another is ESD diodes rated for 3.3V on a 4.6V level translator.
DRCY reviews schematics only. It does not check layout or footprints. The visual diff covers the rest of the swap, showing the changed part number at the attribute level so the reviewer sees exactly what moved.
Where AI helps and where it does not
AI is useful for the reading work. It can cross-reference datasheets for every part in a design and summarize where lifecycle risk sits across a BOM. In DRCY Chat, an engineer can type a question such as "Which parts on this BOM carry the most supply risk?" The answer is a prioritized starting list for review.
AI cannot know about a discontinuation the manufacturer has not announced. AI obsolescence forecasting works from public signals, and those signals have gaps.
The lifecycle status of record still comes from the parts-data API your Automation calls.
DRCY will raise some findings that turn out not to apply, so treat its output as a first pass. Every finding links back to the datasheet page behind it, so an engineer can check the reasoning directly. For a wider look at AI in design review, see what AI design review catches and where it falls short.
When redesign is unavoidable: keep the ECN traceable
Sometimes no path avoids a PCB redesign for obsolescence. The usual trigger is a critical-function part with no drop-in alternate on a product with years of shipments left.
Run the engineering change notice (ECN) work as a Design Review on its own branch. Visual diffs show every changed schematic and layout object, and the BOM diff shows each swapped line. Cut the Release only after the review is approved.
Keep the change out of product lifecycle management (PLM) until it is ready. Pushing half-finished revisions into PLM creates records that someone has to undo later. Our post on ECAD and PLM change management explains the handoff in detail.
Keep the checks running and track the results
An obsolescence management process needs two kinds of checks. Event-driven checks run whenever the design changes. Scheduled checks catch new notices for products that already ship. For production BOMs, we recommend a full re-evaluation at least every 6 months.
Track four metrics to see whether the process works:
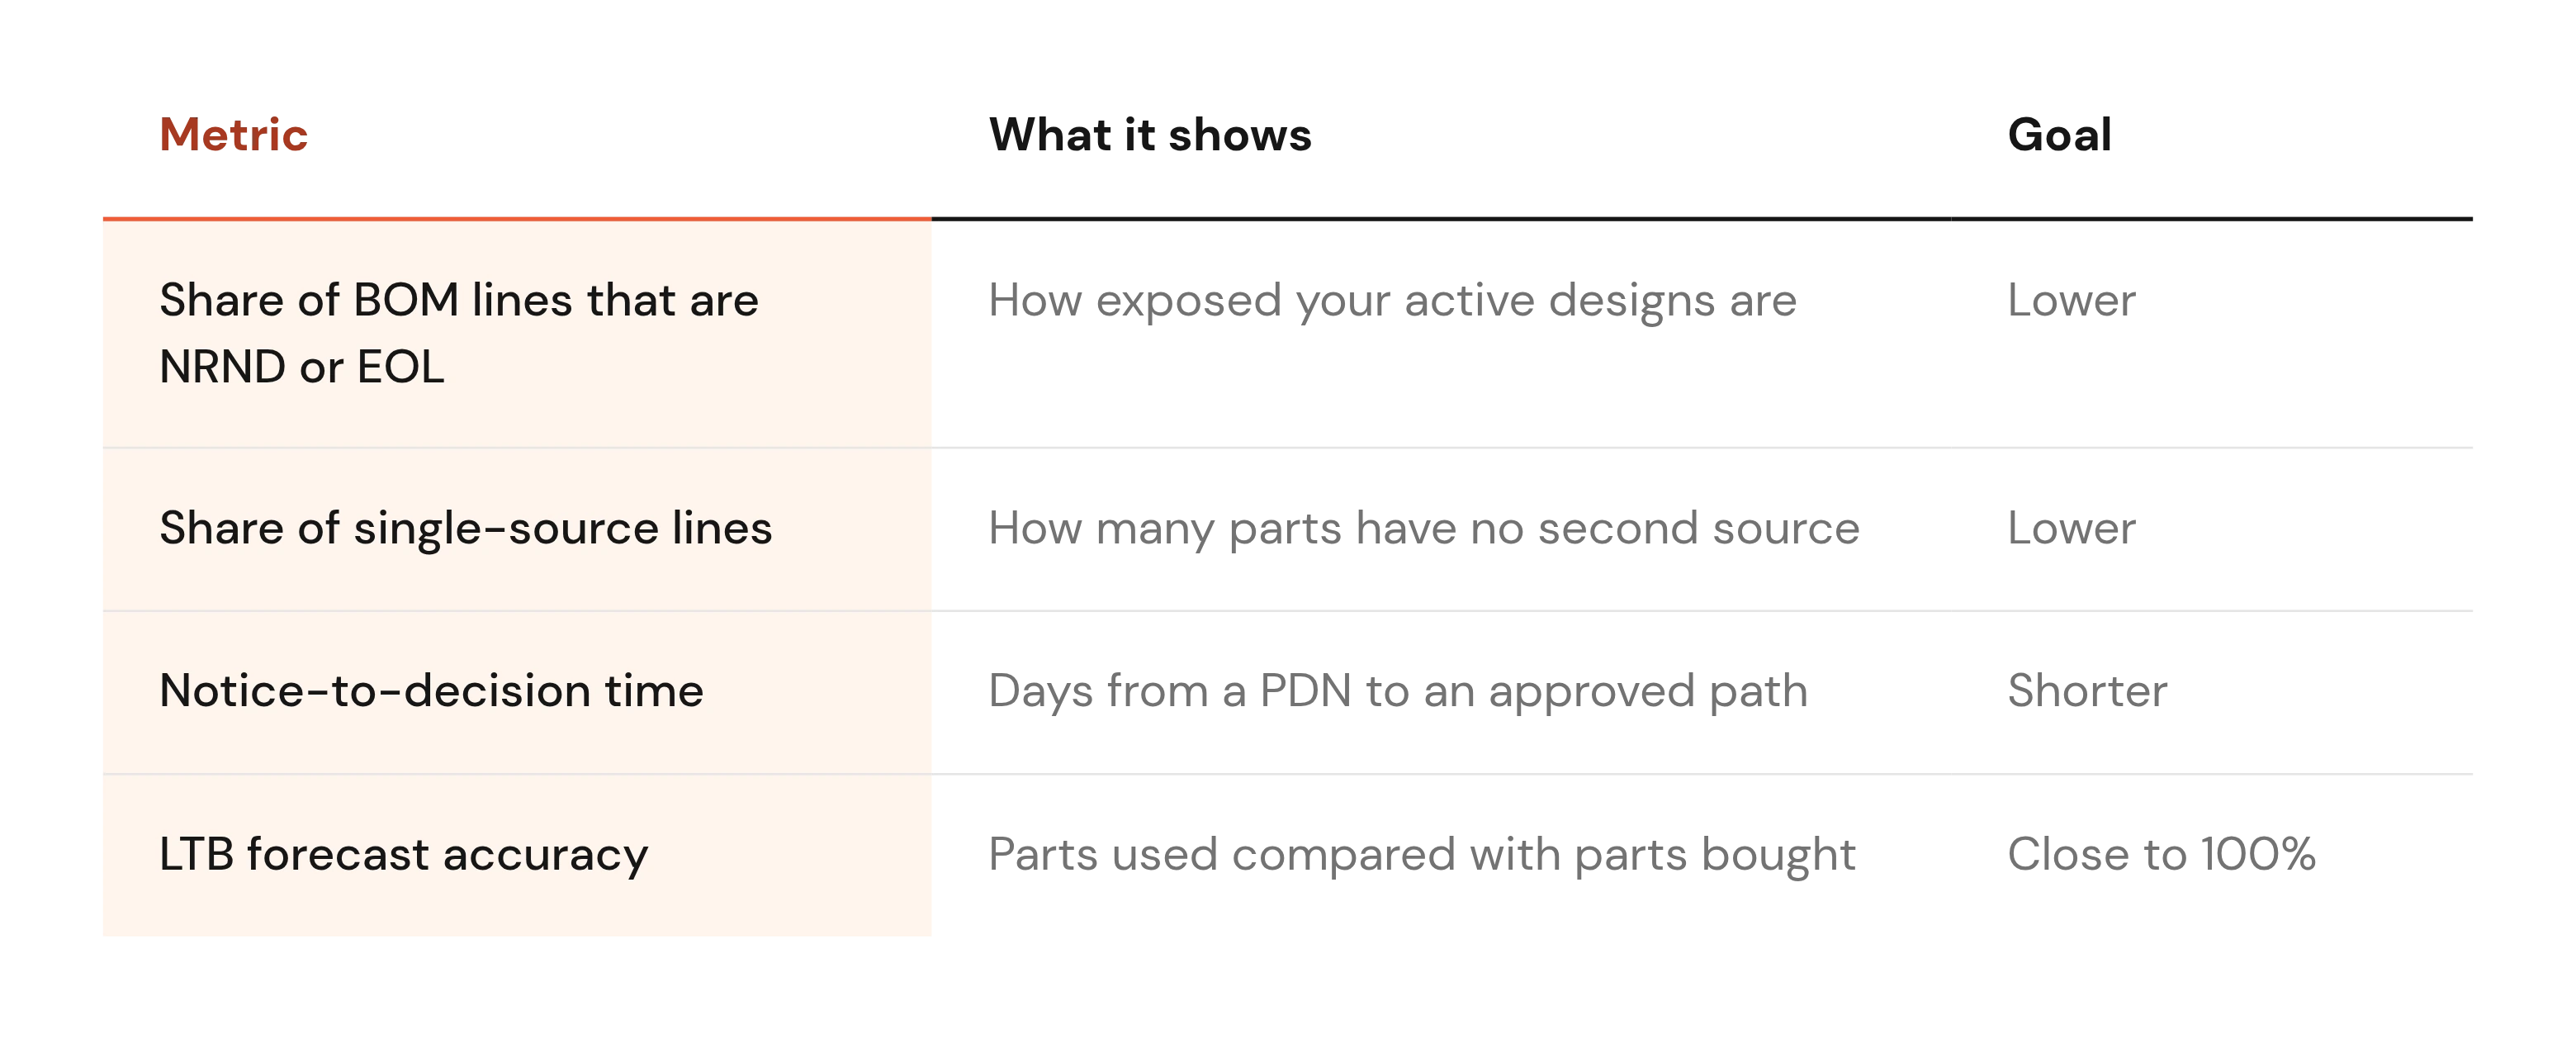
For the formal plan, the International Electrotechnical Commission publishes the IEC 62402 obsolescence management standard. The 2019 edition gives requirements and guidance on policy, an obsolescence management plan, design strategies, and resolution selection. Your Automation runs then show that the team follows the plan.
FAQs
What is the difference between EOL, NRND, and obsolete?
NRND parts still ship but are not recommended for new designs, and EOL parts have a discontinuance notice with a final order date. Obsolete parts are no longer made or orderable from the original source.
How do I calculate a last-time buy quantity?
Multiply monthly demand by remaining months of support, then by a safety factor your team chooses. Pull demand from ERP and plan storage before you buy.
How often should we re-check a BOM for obsolescence risk?
Check on every design review and BOM change. For production BOMs, add scheduled re-runs at least every 6 months.
Who is responsible for monitoring lifecycles, the OEM or the CM?
The OEM owns the design and the decision, so it should own monitoring. Write any CM notice obligations into the contract and route them into the same workflow.